How to Do Needle Weaving According to a 1950s Sewing Book
This is how they fixed things in the old days.
Back in the old days it was common knowledge that in order to keep your clothes in good repair you had to learn how to mend things properly. Girls and women were the main menders, but sailors and army men also had to learn some of these techniques as well. One of the most popular repairing techniques, aside from patching, was needle weaving or darning. You might be used to seeing socks darned, but this method works on a variety of fabrics and garment styles. And, if it’s done well, can look quite good in the end. Here is how to use this technique from a 1954 book on sewing.
You can use a darning egg or mushroom for reworking a worn-through heel on a pair of knit socks, but the technique for needle weaving on woven fabrics is a bit different. Simliar to how you’d use the curved shape of the darning tool to make sure the heel came out round again once it was repaired, to needle weave on flat woven fabrics you’ll sew it pulled taught with your fingers so that when its done it will lie flat.
The method comes from the book, Thrift with a Needle, that showed how to repair all kinds of things. Sewing expert, Evelyn Wood, takes us through the steps to learning this old fashioned technique.
To start out you will need to add some running stitches lengthwise through the damaged area. The thread that goes across the hole will look straight, but that area will be filled in once you’re done.
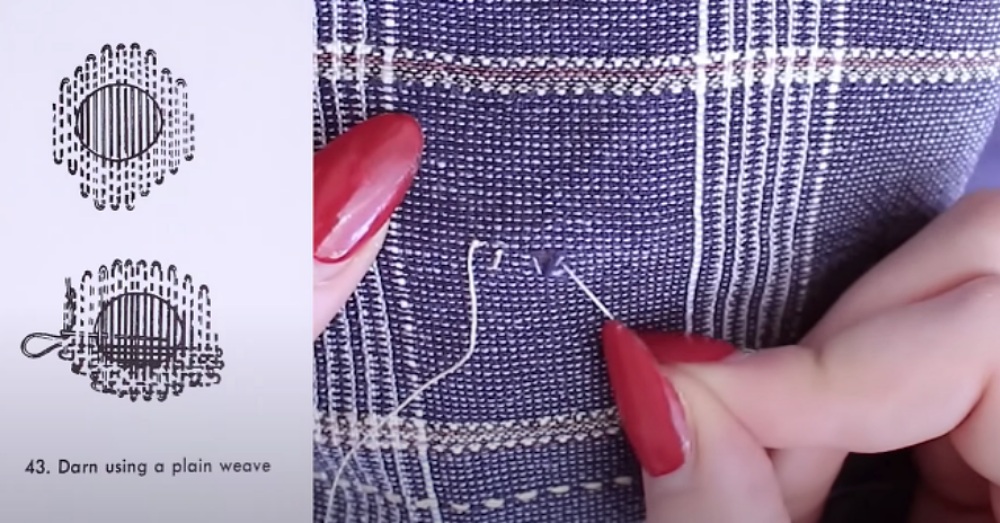
Then the stitches are made in the opposite direction in an over-under way that mimics the woven structure of the original fabric- hence the name “needle weaving”. According to the book you’ll need to keep the overall repair in the shape of diamond, with the stitches at the ends of the tear tapering to a thin area.
See more on how to do this 1950s techinque in the video below.
More to Explore
SKM: below-content placeholderWhizzco for DOT